CCD - An Alternative to a Larger Scope
By John Ambrose
Who hasn't looked through the eyepiece at one time or another and said to himself, I need a bigger scope everything is just too dim. It is everyone's quandary. not enough light gathering power and the never ending quest for bigger aperture. But before running to the store with wallet in hand I think there are some things you may want to consider.
I have had my bouts with aperture fever as well but one event got me thinking about the whole matter and forced me to do a little research. I was up at Mt Laguna, California, visiting my old astronomy club while out on a business trip in San Diego. I took my 5-inch Celestron (C5+) along for the occasion. I was looking at M1 and beside me was a fellow with a 10-inch LX200 looking there also. As I looked through his scope I expected to see an image 4 times brighter since the ratio of imaging areas is 4:1. What I saw was an image just as faint but twice as large. Hey, I thought, this does me no good at all - twice a faint smudge is still a faint smudge. What is wrong with this picture?
Well the problem as most have already guessed is that both systems were f/10's and anyone familiar with photography knows that the f/stop of your camera is directly proportional to image brightness. In order to increase brightness you need to step down an f/stop or two. The same holds true in astronomy except that we don't open an iris we increase the ratio of aperture to focal length. We get a faster scope. So in order to get a brighter image with the 10-inch an f/6.3 scope would have done better and an f/4 better still. Of course this assumes we are using the same eyepiece for comparisons and admittedly even an f/10 will show stars brighter and you see more of them because you have that large primary mirror focusing more light onto the point-source star images. But for distributed objects such as nebula and galaxies the objects will have the same surface brightness as in my 5-inch because they are stretched twice as large.
In order to make the image look four times brighter as the ratio of imaging areas suggests the 10-inch scope would have to have the same focal length as my 5-inch. Then the images would be the same size and the 4:1 advantage would be realized. So for this to happen the 10-inch scope would need a focal length of 50 inches making it an f/5. But now if you pop another eyepiece into the 10 doubling its power you lose your 4:1 advantage and are right back to your f/10 image brightness.
An interesting rule can be derived from this and that is that as you double magnification you reduce image brightness by a factor of 4. So if you start at 50 power and double to 100 and double again to 200 your image brightness is reduced by 16 over what you had when you started. Ouch! That is a big price to pay for twice doubling power. We always knew the image got dimmer but maybe not exactly by how much. As in a famine it is good to start out fat, likewise when ramping up power it is good to start out with a fat primary in a fast system.
However, increasing power to 100 or 150x on a bright distributed object like the "Blue Snowball" (NGC7662) can actually improve your seeing. But not because the rule is invalid it is just that the decrease is object brightness is not as noticeable as the decrease in background brightness, so your net gain is an increase in contrast and a better view.
Image brightness aside a larger scope has the additional advantage of greater resolving power. The Dawes limit goes from .9 arcsec with a 5-inch scope to .5 arcsec with a 10 because of the smaller diffraction pattern of the 10-inch scope. So with the bigger scope you have twice the star splitting power with doubles and you will be able to see much more detail on planets and such.
But for those who just want to brighten the faint fuzzies you might want to consider another alternative to going to a larger scope. I have found an excellent way to increase light gain is to plug in a Charge Coupled Device (CCD) camera. With a CCD image you not only get to see the object more defined and brighter you get to take it home with you and pin it up on the wall. Better than fond memories you are able to appreciate it each and every day as you gaze at your corkboard.
You also gain in image size since your view is not only brighter it is larger. The object is substantially larger than anything you will ever see through the eyepiece at that brightness. Also a CCD is able to very nicely cut through light pollution because of its large dynamic range and the ability through a contrast stretch to shift the viewing window above the light pollution floor to where it bounds only the object of interest. Most of my shooting is done from a ball field not far from my light polluted suburban home. So no need to trek off to the hills on long journeys for dark skies and this means more time on-site for viewing.
And with a CCD there is no need to send out photos for processing because the results are immediately available on your laptop computer. A number of programs are available that will allow you to combine or mosaic images and to enhance the final product through image processing. You can spend hours on a rainy day going over your old shots experimenting with the many techniques available and continue your hobby despite the clouds.
As an example of what can be accomplished with entry level equipment this shot of M1 below was taken during one of my first sessions. The shot was taken with an SBIG ST-5C camera and a Celestron C5+ telescope using an f/3.3 focal reducer. Exposure was 14 minutes accomplished by stacking 84 10-second shots or (84 x 10 sec in shorthand).
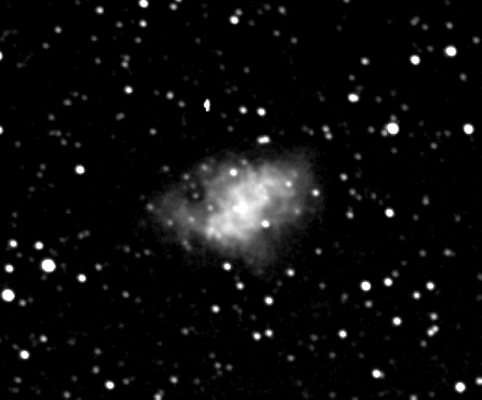
|
A more recent shot of M1 using upgraded equipment: telescope, 10-inch LX200GPS and Starlight Express MX716 CCD, is seen below. Exposure was 16 minutes (48 x 20 sec), also using an f/3.3 focal reducer.
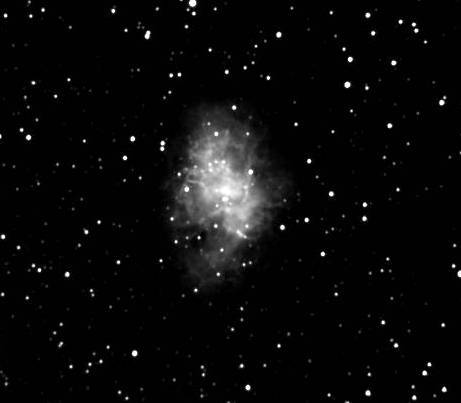
|
The new camera has twice the field coverage of the old and the 10-inch scope twice the resolving power of the C5. Focus was achieved using a Hartman mask and the diffraction patterns of trianglular shaped holes rather than the standard round ones. (S&T September 2001, "Focusing a CCD Camera") As you improve your equipment and technique your shots improve also.
But it is a little unfair to my ST-5C to compare the images one to one in size since the MX716 contains four times the pixels and is double the dimensions of the ST-5C. A fairer comparison is to reduce the ST-5C image to show the same pixel density on the page like so?
|
At equal pixel density the ST-5C compares more favorably. This fact is often overlooked in comparing CCD shots taken with cameras having substantial differences in chip size. Stretching a smaller chip-size image to fill a standard photo format size causes the image to look somewhat unfocused even though the focus quality may be the same in each.
As I look back on my first shots I can easily see the need for improvement though at the time they were my trophies. And possibly at some point in the future I may look at my current shots the same way. But the fun of CCD is that you will enjoy your shots no matter what stage you are in. They will be your trophies. And you will be delighted in how much more you can now see of the objects that for so long you strained at the eyepiece just to detect.
CCD photography is the great equalizer for the small amateur telescope. Those comments in star atlases "needs at least a 10-inch" or "best seen in a 14-inch", etc., will never apply again. All is within your reach in CCD astronomy no matter the size of your scope. And you will be surprised at how many of your shots compare well to the professional shots listed in Burnham taken prior to the 1977 publishing date. So if you are looking to invest in a system upgrade, a bigger scope need not be the answer at all. You can stay with what you have and add a CCD camera. For a decent laptop computer and an entry level CCD your cost will be less than $2000. And your camera will work on a larger scope if you should go that route in the future. Enjoy!
Return to Website click here