Shooting Mars with a Digital Camera
By John Ambrose
With the close pass of Mars this summer and it being the best in thousands of years I wanted to try capturing the red planet in color. My CCD camera is monochrome and rather than buy a set of filters and do tri-color imaging I decided to buy a digital camera, a Nikon 4500. From what I have been seeing on the Internet and in print stacking shots from a digital camera or videocam can produce some sparkling results. The expense isn't all that great and at worse I could use it to replace my old camera for terrestrial shooting. So I launched into the world of digital camera astrophotography.
Straight away there were some problems to solve. Shooting must be done afocally, that is you must image through and eyepiece and I had to have some sort of remote triggering mechanism in order to take steady shots. So I bought a camera-to-eyepiece mounting adapter from Orion and found a freeware program on the Internet called "TheForce" that allows remote shutter control of the 4500 through my laptop. Finally I needed some means to check focus rather than using a magnifying glass with the small LCD screen and crouching down behind the camera. So I bought a small 5-inch black-and-white potable TV from Radio Shack which allowed direct connection to my camera through the TV-out jack. This took care of the hardware and control issues so now on to camera setup, shooting and processing.
The Nikon 4500 allows setting picture quality and picture size (pixel dimensions) at several levels. Setting quality to "fine" gives 1x1 binning and the best detail. Setting pixel dimensions is a bit more tricky. If you want to go about it in an analytical fashion first you need to compute the limiting resolution of your scope. The angular diameter of a star image in your scope, the "airy disc", is computed as 9/D where D is the scope's diameter in inches. For my 10-inch scope the airy disc size is .9 arc-seconds. The Dawes limit or the minimum separation between two stars before they can be resolved is approximately half this value or .5 arc-seconds. According to Nyquist sampling criterion as a minimum you need to have 2 pixels defining this resolution limit or a pixel every .25 arc-seconds. Therefore if the field of view in my camera setup is let's say 3 minutes across I will need a minimum of 720 pixels for best definition (180/.25).
If you would rather "fly by the seat of your pants" just select the highest pixel dimensions that will give you enough shots on your memory chip (400 is nice) and also allow a reasonable download time between shots. In continuous mode you will be shooting possibly 30 or more shots consecutively and at 1280 x 960 pixel dimensions 30 shots takes 30 seconds for the shooting and another 75 seconds to download from the camera's clipboard to the memory chip. The 4500 allows pixel dimensions of from 2272x1704 to 640x480; using 1280x960 seems a nice compromise and allows 400 shots on my memory chip which has a size of 256 meg. I set the camera to "normal sharpening" and have found this works well as a front-end image processor.
The higher the shutter speed the better in order to reduce tracking and vibration error and the effects of turbulence in the atmosphere. But there is a compromise between shutter speed, image density and magnification. If I zoom to max with the cameras 4x zoom I achieve the largest image on the chip but I am forced to shoot at 1/8 second using my 15-mm eyepiece and 10 inch f/10 telescope. However by stepping back on the zoom you can increase image density and increase shutter speed to a more respectable 1/15 or 1/30-sec exposure. This of course decreases image size and increases field of view so you may need to adjust your pixel dimensions to compensate.
Now that hardware, software and camera settings are all in place it is time to start your session. For planetary shots I have found that centering the object in the finder scope cross hairs is sufficient to place it on the chip. With deep sky objects this is not as easy since the object is often not visible in the finder. So adding a flip-mirror system that allows straight through to camera or reflex view to eyepiece is a better approach. I have Meade's flip mirror system and it works well. Actually I use it for planets also because my eyepiece is adjusted parfocus to camera, so when eyepiece is in focus so is the camera. This speeds up initial acquisition and focusing. But even with all the tools I've had to do vertical sweep patterns to find the planet. Your field of view is very small and it does not take much for you to lose orthogonallity with the camera-eyepiece setup. Scopetronix makes eyepieces that screws directly into the lens cap of the 4500. This is the best way to go because it assures orthogonallity throughout the evening. But my Orion adapter allows the use of all the eyepieces in my inventory so have been making do. One needs to be careful though in handling the camera and pushing the control switches. It doesn't take much to skew your setup.
I have used a Hartman mask and a bright star for focusing but direct view focusing for Mars has worked well. At maximum zoom the image in my 5-inch monitor is nearly an inch across and good focus can be achieved by just rolling in an out of focus until you arrive at the best estimate. I use an electronic focuser and would not want to try this with manual focus on an SCT since mirror shift would quickly slip the image out of view.
Once focus has been achieved then comes the easy part. Using the remote control software you simply trigger the camera to take a series of consecutive shots wait for download from the clipboard and repeat. In a matter of 15 minutes you can accrue 250 shots with a 1280x960 pixel frame size.
Now for post-processing. For those with masochistic tendencies you can go through the entire pile shot by shot and delete the worst of the lot manually. But there is freeware software available that will do a good job culling the lot automatically and stack and do decent first level image processing as well. Registax2 is one of these programs and is available on the Internet. I have used it with good success through all my Mars processing to date. Neither MaximDL or AstroArt can match what this program can do in combining planetary images.
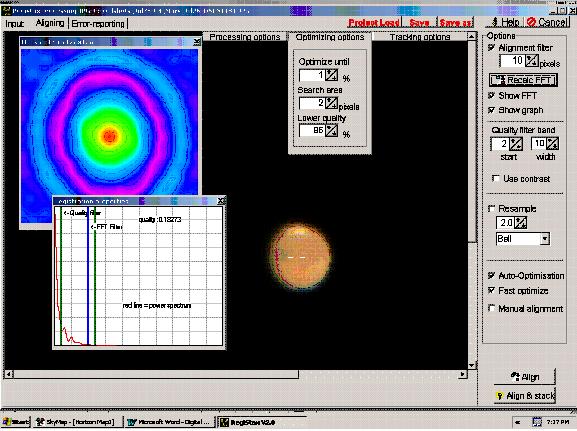
In Registax you select a block of shots and may also include darkframe and flatfield if you like. You then select a single frame as your reference. Here you should find one of the best of the lot. Once selected you see the computed FFT spectrum and the Registration properties on the screen (Figure 1). By increasing the FFT alignment pixels you tighten the registration criterion but too tight can increase the chance of spurious noise and a miss-aligned frame. Setting the quality filter and bandwidth allows it to drop shots that are below par. I have found settings of 10-2-10 for Alignment filter, quality and bandwidth; and 95% for Lower quality to work well. This reduces my initial shot quantity by up to 50% or better and has produced good results.
|
Figure 1 - Registax Aligning Page
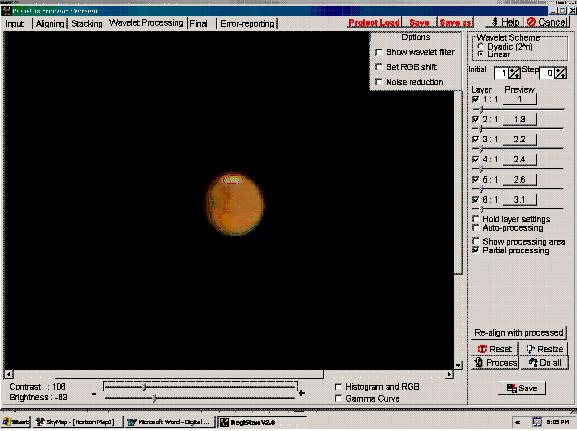
Now after culling the stack of the worst of the lot Registax continues to impress with it Wavelets processing. As seen in Figure 2 the initial stack of 164 was culled to 77 shots and you see the result of 6-level wavelets processing. The levels were selected empirically after trial and error. The values can be seen in the image. Registax does not do the best job with contrast enhancement so from here we must go to other software packages.
|
Figure 2 - Wavelets Processing
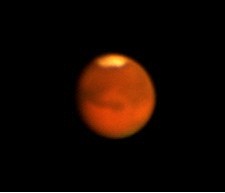
I save the Registax image as a BMP file and read it with AstroArt and crop and save the image in FITS format. Next the color planes must be aligned since Mars is low in the atmosphere and refractive effects have shifted the colors as with a prism into different positions on the image plane. I have found that MaximDL is best at this so import the image and do a manual "realign planes" in the "colors" menu.
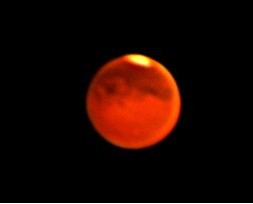
After aligning planes I bring the image back into AstroArt and do Unsharp Mask processing and finish with a contrast stretch. The final image is seen in Figure 3. All shooting was done at Coyle on the dates indicated and all shots use Unsharp Mask processing with Sigma 3.4 and Coef 1.0 except where stated otherwise.
|
Figure 3 - July 26 - stack of 77 of 164
This Aug 16 shot uses a stack of 104 out of 127 images. Exposures were at 1/15 second.
|
Aug 16 - stack of 104 of 127
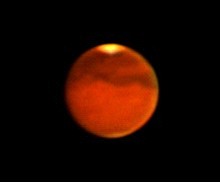
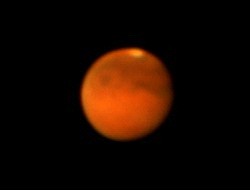
This next shot was taken on Aug 20 and uses a stack of 114 out of 297.
|
Aug 20 - stack of 114 of 297
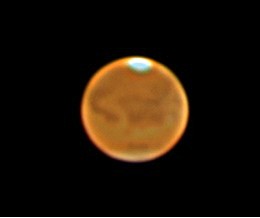
On Aug 28 seeing seemed particularly bad so I pushed the wavelets processing a bit farther than usual. The result was a softening of color and an illuminated rim but the interior has good detail.
|
Aug 28 - stack of 68 out of 70
This last shot was taken on September 24 using 1/30 second exposures. Unsharp Mask processing used Sigma of 4.0 and Coef of .8.
|
Sep 24 stack of 103 of 277
Registax has a reasonably good help file for a freeware program but I am far from mastering the program. As with AstroArt and MaximDL the settings used are my best so far but I am sure improvements can be had. There are a seemingly endless numbers of machinations and combinations of technique and processing that can be done on these images. One could spend all of their weekends experimenting and improving but you reach a point where you say enough is enough this will have to do.
My excursion into digital camera planetary photography has been a challenge and a fun exercise. I hope you have enjoyed the reading and if going this route in digital planetary imaging find this some benefit.
Return to Website click here